Using Convolutional Neural Networks in PyTorch
In this last chapter, we learn how to make neural networks work well in practice, using concepts like regularization, batch-normalization and transfer learning. This is the Summary of lecture "Introduction to Deep Learning with PyTorch", via datacamp.


import torch
import torch.nn as nn
import torch.optim as optim
import torch.nn.functional as F
import numpy as np
import pandas as pd
import matplotlib.pyplot as plt

plt.rcParams['figure.figsize'] = (8, 8)
Sequential module
Having learned about the sequential module, now is the time to see how you can convert a neural network that doesn't use sequential modules to one that uses them. We are giving the code to build the network in the usual way, and you are going to write the code for the same network using sequential modules.
class Net(nn.Module):
    def __init__(self, num_classes):
        super(Net, self).__init__()

        self.conv1 = nn.Conv2d(in_channels=1, out_channels=5, kernel_size=3, padding=1)
        self.conv2 = nn.Conv2d(in_channels=5, out_channels=10, kernel_size=3, padding=1)
        self.conv3 = nn.Conv2d(in_channels=10, out_channels=20, kernel_size=3, padding=1)
        self.conv4 = nn.Conv2d(in_channels=20, out_channels=40, kernel_size=3, padding=1)

        self.relu = nn.ReLU()

        self.pool = nn.MaxPool2d(2, 2)

        self.fc1 = nn.Linear(7 * 7 * 40, 1024)
        self.fc2 = nn.Linear(1024, 2048)
        self.fc3 = nn.Linear(2048, 10)

    def forward():
        x = self.relu(self.conv1(x))
        x = self.relu(self.pool(self.conv2(x)))
        x = self.relu(self.conv3(x))
        x = self.relu(self.pool(self.conv4(x)))
        x = x.view(-1, 7 * 7 * 40)
        x = self.relu(self.fc1(x))
        x = self.relu(self.fc2(x))
        x = self.fc3(x)
        return x
We want the pooling layer to be used after the second and fourth convolutional layers, while the relu nonlinearity needs to be used after each layer except the last (fully-connected) layer. For the number of filters (kernels), stride, passing, number of channels and number of units, use the same numbers as above.
class Net(nn.Module):
    def __init__(self):
        super(Net, self).__init__()

        # Declare all the layers for feature extraction
        self.features = nn.Sequential(
            nn.Conv2d(in_channels=1, out_channels=5, kernel_size=3, padding=1),
            nn.ReLU(inplace=True),
            nn.Conv2d(in_channels=5, out_channels=10, kernel_size=3, padding=1),
            nn.MaxPool2d(2, 2),
            nn.ReLU(inplace=True),
            nn.Conv2d(in_channels=10, out_channels=20, kernel_size=3, padding=1),
            nn.ReLU(inplace=True),
            nn.Conv2d(in_channels=20, out_channels=40, kernel_size=3, padding=1),
            nn.MaxPool2d(2, 2),
            nn.ReLU(inplace=True)
        )

        # Declare all the layers for classification
        self.classifier = nn.Sequential(
            nn.Linear(7 * 7 * 40, 1024),
            nn.ReLU(inplace=True),
            nn.Linear(1024, 2048),
            nn.ReLU(inplace=True),
            nn.Linear(2048, 10)
        )
    def forward(self, x):
        # Apply the feature extractor in the input
        x = self.features(x)

        # Squeeze the three spatial dimentions in one
        x = x.view(-1, 7 * 7 * 40)

        # Classifiy the image
        x = self.classifier(x)
        return x
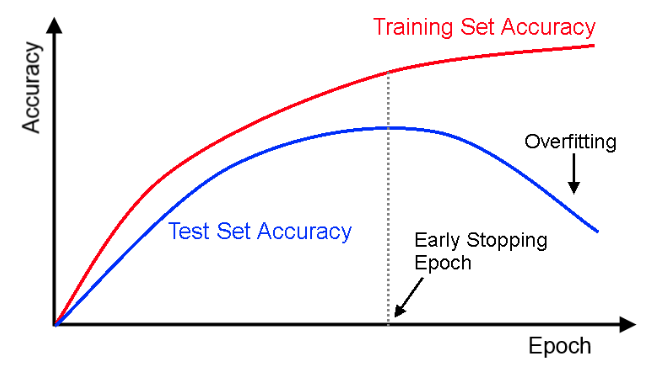
Validation set
You saw the need for validation set in the previous video. Problem is that the datasets typically are not separated into training, validation and testing. It is your job as a data scientist to split the dataset into training, testing and validation. The easiest (and most used) way of doing so is to do a random splitting of the dataset. In PyTorch, that can be done using SubsetRandomSampler object. You are going to split the training part of MNIST dataset into training and validation. After randomly shuffling the dataset, use the first 55000 points for training, and the remaining 5000 points for validation.
import torchvision.datasets as datasets
import torchvision.transforms as transforms

# Shuffle the indices
indices = np.arange(60000)
np.random.shuffle(indices)

transform = transforms.Compose([
    transforms.ToTensor(),
    transforms.Normalize((0.1307, ), (0.3081, ))
])

# Build the train loader
train_loader = torch.utils.data.DataLoader(
    datasets.MNIST('mnist', download=True, train=True, transform=transform),
    batch_size=64, shuffle=False, sampler=torch.utils.data.SubsetRandomSampler(indices[:55000])
)

# Build the validation loader
val_loader = torch.utils.data.DataLoader(
    datasets.MNIST('mnist', download=True, train=True, transform=transform),
    batch_size=64, shuffle=False, sampler=torch.utils.data.SubsetRandomSampler(indices[55000:])
)
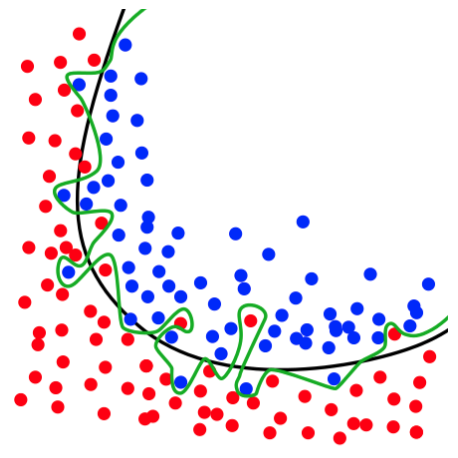
L2-regularization
You are going to implement each of the regularization techniques explained in the previous video. Doing so, you will also remember important concepts studied throughout the course. You will start with l2-regularization, the most important regularization technique in machine learning. As you saw in the video, l2-regularization simply penalizes large weights, and thus enforces the network to use only small weights.
model = Net()

# Instantiate the cross-entropy loss
criterion = nn.CrossEntropyLoss()

# Instantiate the Adam optimizer
optimizer = optim.Adam(model.parameters(), lr=3e-4, weight_decay=0.001)
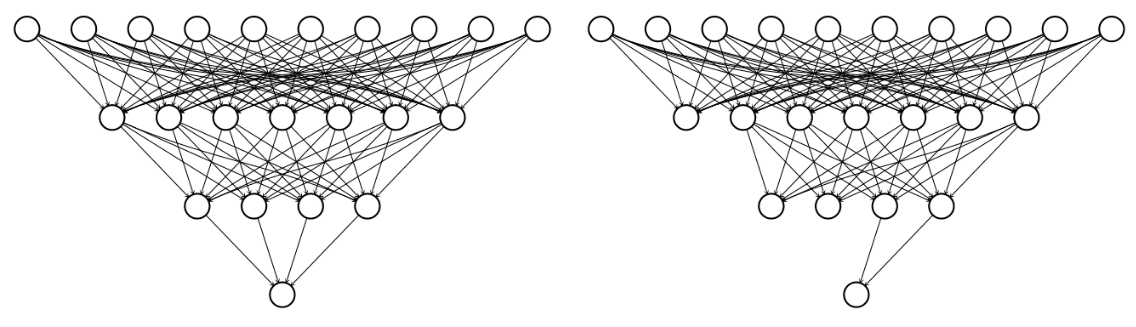
Dropout
You saw that dropout is an effective technique to avoid overfitting. Typically, dropout is applied in fully-connected neural networks, or in the fully-connected layers of a convolutional neural network. You are now going to implement dropout and use it on a small fully-connected neural network.
For the first hidden layer use 200 units, for the second hidden layer use 500 units, and for the output layer use 10 units (one for each class). For the activation function, use ReLU. Use .Dropout() with strength 0.5, between the first and second hidden layer. Use the sequential module, with the order being: fully-connected, activation, dropout, fully-connected, activation, fully-connected.
class Net(nn.Module):
    def __init__(self):
        # Define all the parameters of the net
        self.classifier = nn.Sequential(
            nn.Linear(28 * 28, 200),
            nn.ReLU(inplace=True),
            nn.Dropout(p=0.5),
            nn.Linear(200, 500),
            nn.ReLU(inplace=True),
            nn.Linear(500, 10)
        )

    def forward(self, x):
        # Do the forward pass
        return self.classifier(x)
Batch-normalization
Dropout is used to regularize fully-connected layers. Batch-normalization is used to make the training of convolutional neural networks more efficient, while at the same time having regularization effects. You are going to implement the __init__ method of a small convolutional neural network, with batch-normalization. The feature extraction part of the CNN will contain the following modules (in order): convolution, max-pool, activation, batch-norm, convolution, max-pool, relu, batch-norm.
The first convolutional layer will contain 10 output channels, while the second will contain 20 output channels. As always, we are going to use MNIST dataset, with images having shape (28, 28) in grayscale format (1 channel). In all cases, the size of the filter should be 3, the stride should be 1 and the padding should be 1.
class Net(nn.Module):
    def __init__(self):
        super(Net, self).__init__()

        # Implement the sequential module for feature extraction
        self.features = nn.Sequential(
            nn.Conv2d(in_channels=1, out_channels=10, kernel_size=3, stride=1, padding=1),
            nn.MaxPool2d(2, 2), nn.ReLU(inplace=True), nn.BatchNorm2d(10),
            nn.Conv2d(in_channels=10, out_channels=20, kernel_size=3, stride=1, padding=1),
            nn.MaxPool2d(2, 2), nn.ReLU(inplace=True), nn.BatchNorm2d(20)
        )

        # Implement the fully connected layer for classification
        self.fc = nn.Linear(in_features=20 * 7 * 7, out_features=10)
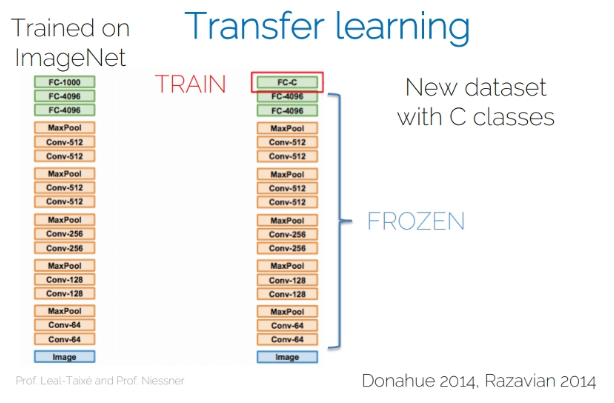
Torchvision module
You already finetuned a net you had pretrained. In practice though, it is very common to finetune CNNs that someone else (typically the library's developers) have pretrained in ImageNet. Big networks still take a lot of time to be trained on large datasets, and maybe you cannot afford to train a large network on a dataset of 1.2 million images on your laptop.
Instead, you can simply download the network and finetune it on your dataset. That's what you will do right now. You are going to assume that you have a personal dataset, containing the images from all your last 7 holidays. You want to build a neural network that can classify each image depending on the holiday it comes from. However, since the dataset is so small, you need to use the finetuning technique.
import torchvision

# Download resnet18
model = torchvision.models.resnet18(pretrained=True)

# Freeze all the layers bar the last one
for param in model.parameters():
    param.requires_grad = False

# Change the number of output units
model.fc = nn.Linear(512, 7)